One of my favorite Purim traditions is giving mishloach manot—baskets of hamantaschen and other treats—to friends and family. Baking hamantaschen with your kids is a lot of fun, but so is assembling the baskets and talking about the importance of giving. This project allows you to take the mitzvah of mishloach manot one step further by creating the baskets themselves using balloons, string and glue. Surprisingly sturdy, pretty easy and, yes, a little bit silly, these DIY string baskets are a great vehicle for your Purim mitzvah.
Materials:
- Latex balloons (7-inch, 9-inch or 12-inch, depending on your size preference)
- 1-2 bundles of 100-percent cotton yarn or string (size three crochet thread works best; four-ply yarn works too, but the drying time is longer since it’s thicker)
- Large bowl
- School glue or Mod Podge
- Water
- Plastic cup
- Disposable plate
- X-Acto knife
- Tissue paper, ribbon or other decorations
Directions:
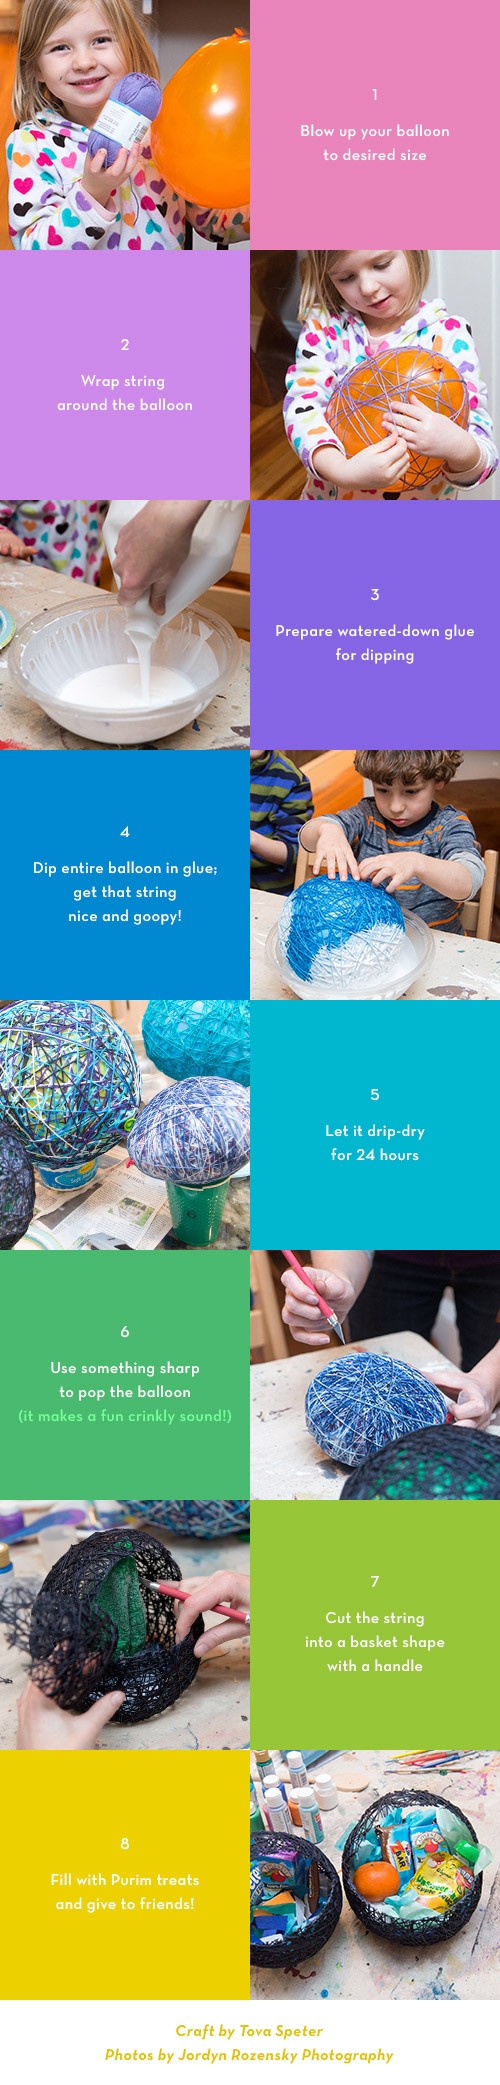
- Blow up your balloon to the desired size of your basket and tie a knot.
- Tie the end of the string around the balloon knot and start wrapping the string around the balloon (it’s easiest to go lengthwise to start). The first wraps of string are tricky because the balloon is slippery, so this part is best started by an adult until there’s enough coverage for the string to grip the balloon more easily (our testers liked unwinding the bundle of yarn across the room as an adult wrapped the balloon!). Crisscross the string around the balloon in all directions until the balloon is fully covered. Try to keep turning the balloon so the string is evenly distributed.
- Once your balloon is fully covered, tie the end of the string onto the balloon knot to secure. (I used an entire bundle of string for a 7-inch balloon, so you may need more if you’re using a bigger balloon. If so, just tie the second bundle to the end of the first and keep wrapping.)
- Prepare a large bowl with a watered-down glue mixture. (If using school glue, mix equal parts glue and water. If using Mod Podge, mix two parts Mod Podge with one part water.)
- Here comes the fun (read: messy) part: Dip the entire balloon into the glue mixture, turning it to make sure all of the string gets completely covered.
- Place the glue-covered balloon on a plastic cup over a plate to dry (the extra glue will drip off on the plate). Let dry at least 24 hours. You may need to rotate the balloon once the top dries to make sure the bottom dries as well. Tip: Before the bottom is completely dry, press it on a flat surface to ensure it can stand on its own afterward.
- Pop the balloon so that only the hardened string form is left (it will make a really fun crinkly noise!).
- An adult should use an X-Acto knife to cut out a section on either side of the balloon, leaving a handled basket. Tip: Use the section cut-out from one side as a stencil for the other side if you want it to be more even (though as a handmade project we’re not going for perfection here).
- Tear tissue paper to fill the bottom of the basket and decorate it with ribbons, if desired.
- Add your hamantaschen and treats and give away to family or friends.
Special thanks to my project testers, Ilan and Yaara Sperber and friends, pictured below!